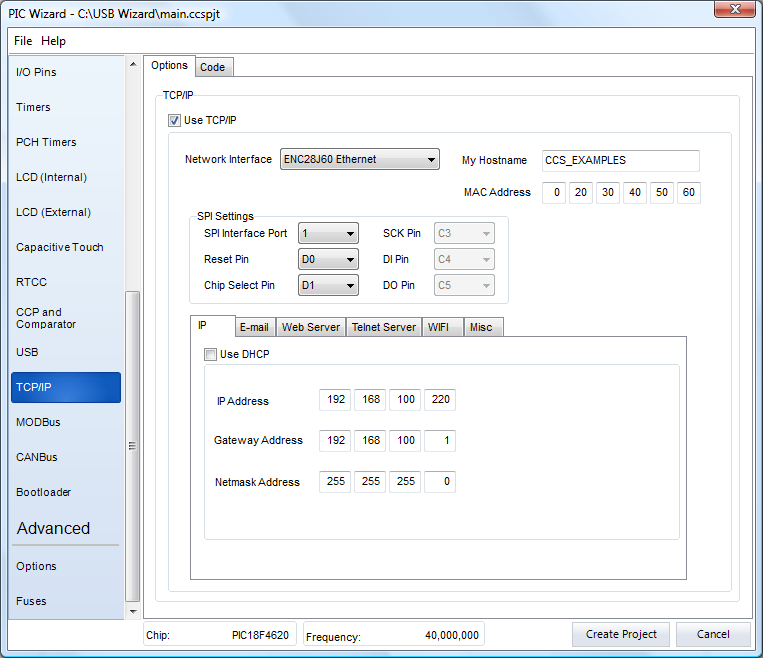
CCS, Inc. Starting with the CCS C Compiler IDE 5.013, TCP/IP is new in the Project Wizard. Effortlessly connect an Ethernet or WiFi ready PIC® to a network. Just specify the interface (ENC28J60 Ethernet, MRF24WG0M 802.11G WiFi) and the SPI connections and the wizard will generate the hardware profile necessary for the TCP/IP stack. The wizard will work for Internet or external Ethernet devices.

Additional options are available in the tabs at the bottom of the setup page for IP and WiFi settings (if applicable) as well as setting up a project for E-mail, a Web Server, or a Telnet Server. These TCP/IP configuration settings are added automatically into the stack and the project. For Telnet servers, all that needs to be specified is the TCP Listen port and the stack is automatically configured for Telnet. In addition, when a TCP/IP project is created, all of the TCP/IP stack files are automatically copied into the project directory and the configuration files are tailored to this project.
Under the IP tab, using DHCP will automatically assign the device an IP address, otherwise the IP, Gateway, and Netmask addresses can be specified for a specific network.
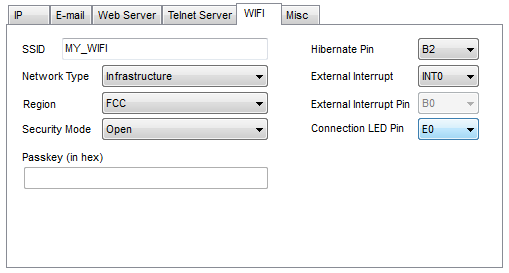
When using WiFi, there are many options for connecting to a network, including SSID, network type (Infrastructure or AdHoc), region, and security mode. If the security mode is anything other than "Open", a passkey or pass phrase is required for connection and must be specified. Supported security modes are: Open, WEP-40, WEP-104, WPA with passkey or phrase, WPA2 with passkey or phrase, and WPA Auto with passkey or phrase. Additional hardware information must also be specified for the WiFi interface including the hibernate pin and external interrupt.

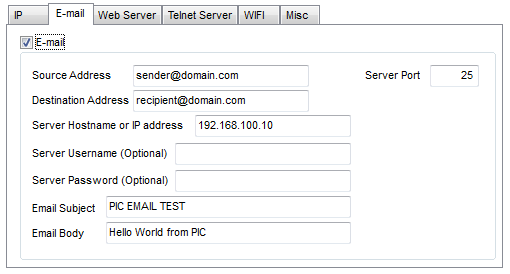
Getting a device set up to send E-mails has never been easier. Just fill in the required fields and all of the setup code is generated. The only thing left to do is to tell the stack to send the E-mail!

If you want to customize the E-mail body at runtime, such as sending a current ADC reading, it is as simple as a sprintf to the global body variable. The example below shows just how simple sending an email can be and one way to change the body at runtime.
while(TRUE) // in main()
{
StackTask();
StackApplications();
// User Code
if(BUTTON_PRESSED)
{
sprintf(SMTPClient.Body.szRAM,"ANALOG CHANNEL 0 = 0x%X", read_adc());
EmailNow();
}
}
To set up a simple web server, just specify the server port and the number of dynamic display fields and buttons to show on the page. The wizard generates a "pages" directory with the project including index.htm and index.xml files for the server. These can easily be customized or changed based on what you want the server to do, and helpful "TODOs" are added in the code where additional processing is needed.

The very minimum you have to do is handle the callback functions to the HTTP Stack. These are what make the changes on the web page and/or on the PIC. The below web page was created with two dynamic display fields (shown in the table) and three input buttons. The first dynamic field shows the current ADC reading on channel 0, and the second shows the current pressed/released state of a push button. The three input buttons are used to toggle LEDs on the board from within the page itself.

To accomplish this, the
http_exec_cgi callback function is called with each key/value pair read in a GET/POST request before any web data is sent to the web browser, which in this case is set up to toggle LEDs. The
http_format_char callback function is used to update the dynamic display fields (differentiated by "id") of the page itself, updating "str" with the new value of the element to be displayed. The wizard generates these functions, and all you have to do is fill in what you want each button to do and what each dynamic display element should contain.
unsigned int8 http_format_char(char* file, char id, char *str, unsigned int8 max_ret)
{
char new_str[25];
if(id == 0) //dynamic element 0
{
sprintf(new_str,"0x%X", read_adc());
strncpy(str, new_str, max_ret);
}
if(id == 1) //dynamic element 1
{
if(BUTTON_PRESSED)
new_str = "Pressed";
else
new_str = "Released";
strncpy(str, new_str, max_ret);
}
}
void http_exec_cgi(char* file, char *key, char *val)
{
if (stricmp(key, "button00")==0)
{
output_toggle(GREEN_LED);
}
if (stricmp(key, "button01")==0)
{
output_toggle(YELLOW_LED);
}
if (stricmp(key, "button02")==0)
{
output_toggle(RED_LED);
}
}
The wizard initially generates default index.htm and index.xml files for the page with initial values for the page title and heading, the left column of the table, and the button text. These can easily be changed by modifying the index.htm file, as was done on the example page. index.xml is used by the AJAX Javascript running on the webpage, which allows for the content on the page to refresh without having the user need to press the reload button on their browser.
CCS IDE Project Wizard includes USB as well as TCP/IP. The IDE requires a minimum operating system of Windows 95(or later) or Linux.
Like us on
Facebook. Follow us on
Twitter.
About CCS:
CCS is a leading worldwide supplier of embedded software development tools that enable companies to develop premium products based on Microchip PIC
® MCU and dsPIC
® DSC devices. Complete proven tool chains from CCS include a code optimizing C compiler, application specific hardware platforms and software development kits. CCS' products accelerate development of energy saving industrial automation, wireless and wired communication, automotive, medical device and consumer product applications. Established in 1992, CCS is a Microchip Premier 3rd Party Partner. For more information, please visit
http://www.ccsinfo.com.
PIC
® MCU, MPLAB
® IDE, MPLAB
® ICD2, MPLAB
® ICD3 and dsPIC
® are registered trademarks of Microchip Technology Inc. in the U.S. and other countries.
